

First of all, please read the last blog if you haven't already because it contains instructions on how to install React Js on your computer.
Link to the last Blog: Link
Let's discuss some local files first before moving toward JSX.
1. index.js : (entry point of javascript)
import React from 'react';
In the given code snippet, the
importstatement is used to import theReactobject from the 'react' module. This allows you to use the functionalities provided by React in your code.For example, you can use it to define and create React components, manage component state, handle events, render UI elements, and more.
import ReactDOM from 'react-dom/client';
The code
import ReactDOM from 'react-dom';is another import statement in JavaScript. In this case, it imports theReactDOMobject from the 'react-dom' module.React DOM is a separate package from React and is specifically used for rendering React components to the DOM (Document Object Model), which is the web page's structure and content representation.
By importing ReactDOM you gain access to various functions and methods provided by React DOM for rendering components. The most commonly used function is ReactDOM.render(), which takes a React component and a target DOM element and renders the component into that DOM element.
const root = ReactDOM.createRoot(document.getElementById('root'));
root.render(
  <React.StrictMode>
    <App />
  </React.StrictMode>
);
The
ReactDOM.createRoot(document.getElementById('root'))function creates a root instance for rendering React components. It takes the DOM element with the ID 'root' as the argument and returns a root object.The
root.render(...)method is called on the root object to render the React component. It renders theAppcomponent wrapped in a<React.StrictMode>component.<React.StrictMode>is a built-in React component that helps identify potential issues in the application during development.
2. App.js :
import './App.css';

export default function App() {
  return (
    <div>
      <h1>Welcome to My React App!</h1>
    </div>
  );
}
In React, the
App.jsfile typically represents the main component of a React application. It's a convention to name the main component file asApp.js, but you can choose any other name as well but remember component name should always start with a capital letter.Above is the simplest way to create your App component.
Now let's discuss JSX.
Introduction to JSX:
What is JSX?
JSX (JavaScript XML) is a syntax extension used in React to write HTML-like code within JavaScript.
1. Syntax:-
export default function App() {
  return (
    //Everything inside it is known as JSX
  );
}
The code written inside the close brackets of the return statement is known as JSX.
Your component also can’t return multiple JSX tags. You have to wrap them into a shared parent, like a
<div>...</div>or an empty<>...</>wrapper.<>......</>These are known as JSX fragments.JSX is stricter than HTML. You have to close tags like
<br />,<input type="text" />,<img src=" " />
2. Comments:-
// App.js

export default function App() {
  return (
    {/* These is a syntax for comment */}
  );
}
- {/* .... */} Everything inside these brackets is a JSX comment
3. Using curly braces: A window into the JavaScript world:-
// App.js

export default function App() {
  const name = 'Kevin Usadadiya';
  return (
            <h1>{name} is a Front-end Developer.</h1>
  );
}
- JSX is a special way of writing JavaScript. That means it’s possible to use JavaScript inside it—with curly braces
{ }.
4. Attributes:-
// App.js

export default function App() {
  return (
        <>
            <div>
                <p className = "para"> This is a para </p>
            </div>
            <div>
                <label htmlFor = "my_id"> Identity : </label>
                <input type = "text" id = "my_id" />
            </div>
        </>
  );
}
In React, many HTML and SVG attributes are written in camelCase. For example, instead of
stroke-widthyou usestrokeWidth.Since
classis a reserved word, in React you writeclassNameinstead, alsoforinside<label>tag is changed tohtmlFor
5. Styling:-
In addition to strings, numbers, and other JavaScript expressions, you can even pass objects in JSX.
  // App.js

  export default function App() {
  const my_style = {
      color : 'white',
      backgroundColor : 'blue'
  }
    return (
          <>
              <div>
                  <p className = "para" style = {my_style} > This is a para </p>
              </div>
              <div>
                  <label htmlFor = "my_id"> Identity : </label>
                  <input type = "text" id = "my_id" style = {{ color : 'white',
                            backgroundColor : 'green'}}/>
              </div>
          </>
    );
  }
There are two methods, you can create an object my_style and pass it to style inside single curly braces or you can directly create the object inside style with double curlies.
Introduction to Components: -
Your first Component:-
Step-1: Defining the Component
There are two ways to define your component:-
Directly in the src folder:-
Create a new folder named components inside the src folder and create a component there:-
In your case, App.js is a component that is directly created in the src folder
For example:-
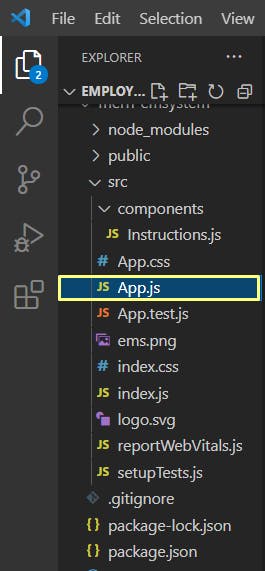
As you can see in the given image a components folder is created, inside which the Instruction.js component is created and in the src folder App.js component is created directly.
Now once your component file is created, What's the next step? , What will you add to that file?
In your case, App.js already has some code as it came from the create-react-app command.
Let's write some code in the Instruction.js file:-
// Instruction.js

export default function Instruction(){
    return(
        <div>
            <h1>This a Instruction component.</h1>
            <p>The export default prefix is a standard JavaScript syntax
               (not specific to React). It lets you mark the main function
                in a file so that you can later import it from other
                files. (More on importing in Importing and Exporting
                Components!)
            </p>
        </div>
    )
};
Once the component is created, let's see the next step how to import and export the component.
Step-2: Importing and exporting components
You can declare many components in one file, but large files can get difficult to navigate. To solve this, you can export a component into its own file, and then import that component from another file:
// App.js
import Instruction from './components/Instruction';

export default function App() {
const my_style = {
    color : 'white',
    backgroundColor : 'blue'
}
  return (
        <>
            <div>
                <p className = "para" style = {my_style} > This is a para </p>
            </div>
            <div>
                <label htmlFor = "my_id"> Identity : </label>
                <input type = "text" id = "my_id" style = {{ color : 'white',
                          backgroundColor : 'green'}}/>
            </div>
            <div>
                    <Instuction/>
                    {/* <Instruction></Instruction> */}

            </div>
        </>
  );
}
Components can render other components, but you must never nest their definitions:
export default function App() {
// 🔴 Never define a component inside another component!
 function Instruction() {
 // ...
    }
 // ...
}
Instead:-
export default function App() {
  // ...
}

// ✅ Declare components at the top level
function Instruction() {
  // ...
}
Introduction to Props:-
React components use props to communicate with each other.
Every parent component can pass some information to its child components by giving them props.
Props might remind you of HTML attributes, but you can pass any JavaScript value through them, including objects, arrays, and functions.
Step-1 : Pass props to the child component
//App.js
//Parent --> App.js
//Child --> Instruction.js

import Instruction from './components/Instruction';
function App() {

  return (
              <>
                  <div>
                    <Instruction person={{name: 'Kevin', id : '128'}}/>
                  </div>
              </>
  );
}

export default App;
Here we are passing a prop which is the person(an object).
Step-2 : Read props inside the child component
You can read the prop by listing the name person inside ({ and }) directly after function Instruction. This lets you use them inside the Instruction code, like you would with a variable.
//Instruction.js
export default function Instruction({person}){
    return(
        <>
        <div>
            <h1>Employee name : {person.name}</h1>
            <h1>Employee Id : {person.id}</h1>
        </div>
        </>
    )
};
There's another way to pass props.
Create a const object person and pass it to the details prop
//App.js
import Instruction from './components/Instruction';
function App() {
 const person = {name: 'Kevin', id : '128'}
  return (
              <>
                  <div>
                    <Instruction details = {person}/>
                  </div>
              </>

  );
}
export default App;
React component functions accept a single argument, a props object:
//Instruction.js
export default function Instruction(props){
    return(
        <>
        <div>
            <h1>Employee name : {props.details.name}</h1>
            <h1>Employee Id : {props.details.id}</h1>
        </div>
        </>
    )
};